


For the softest gluten free Japanese milk bread, start with a easy cooked water roux of water and gf flour. It is simpler than you suppose, and you will be amazed at how tender, chewy, and scrumptious this gf bread is!
This tremendous easy recipe for gluten free Japanese milk bread makes the softest recipe for batter-style gluten free bread you have ever seen, or tasted!
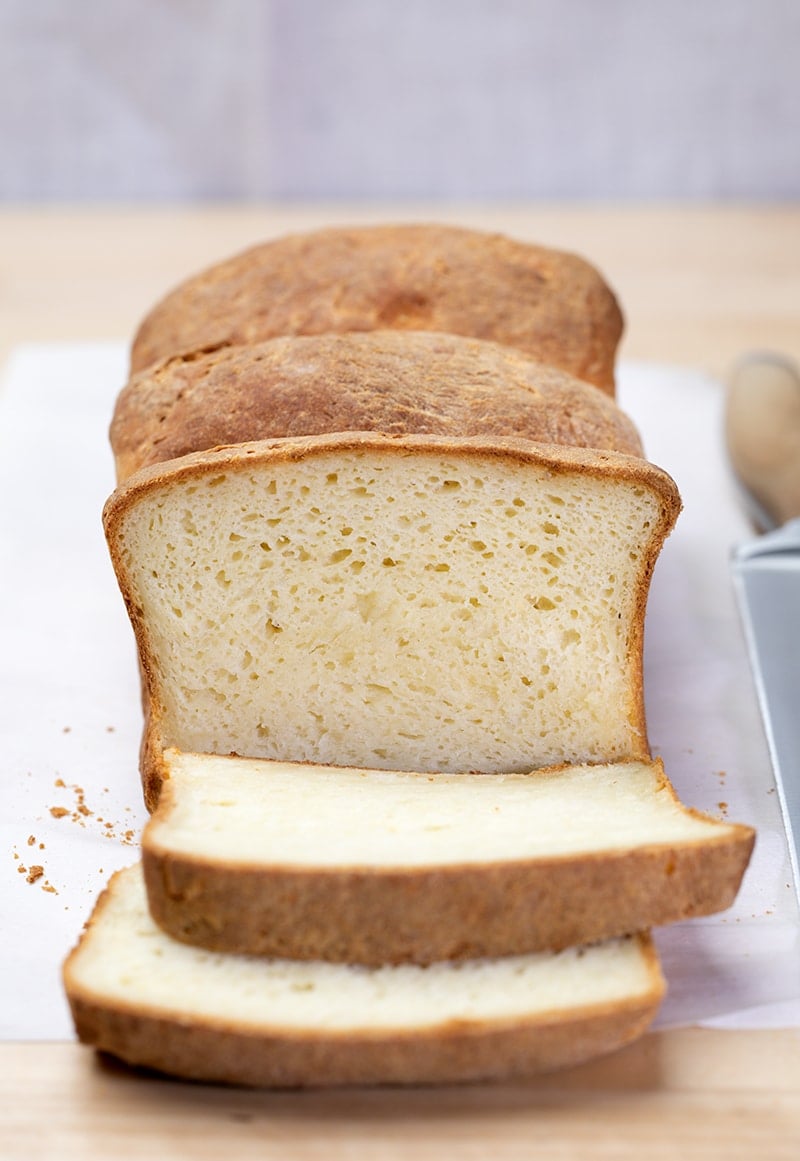
Think about biting into a chunk of bread that is extremely delicate, tender, and fluffy, with a skinny, crisp, but chewy crust that leaves you yearning for extra. Welcome to the world of gluten free Japanese milk bread, a pleasant culinary expertise that may redefine your expectations of gluten free bread.
This wonderful recipe combines a easy cooked gluten free flour and water combination and batter-style bread to create an unbelievably delicate and pillowy texture that may go away you in awe.
Say goodbye to the dry, crumbly gluten free breads of the previous and hiya to the softest, most scrumptious, stay-fresh gluten free bread you have ever tasted!
Why you will love this gluten free Japanese milk bread recipe
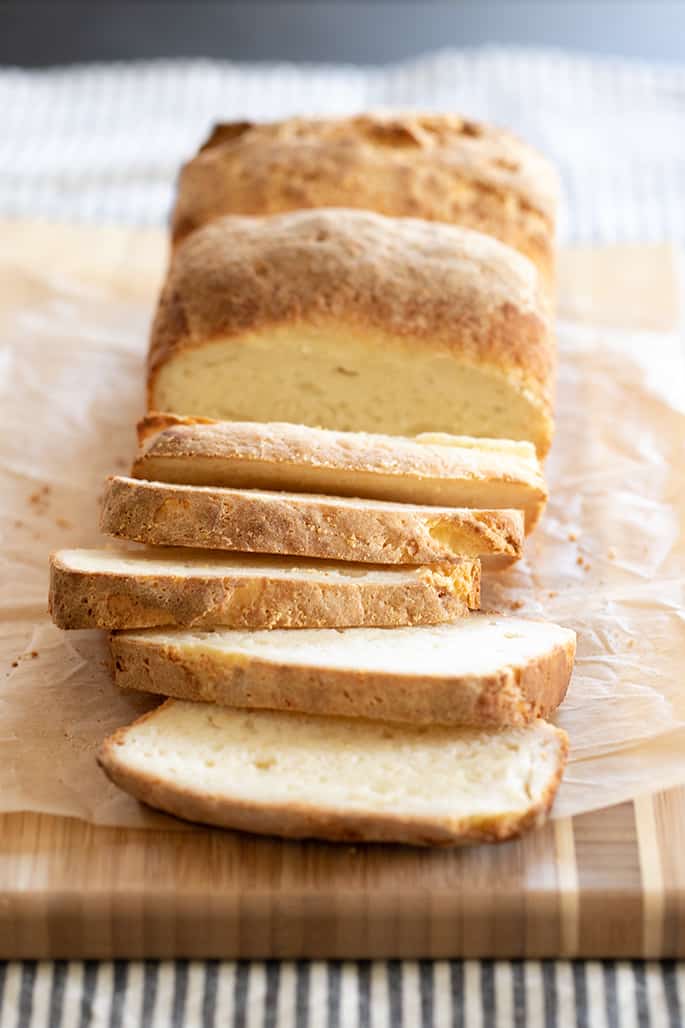
This loaf of bread is delicate and tender with out being tremendous ethereal, like an English muffin bread. The crust is skinny and crisp, however nonetheless tender and chewy.
It is principally the softest bread you will ever eat—and it is easy to make, too. The straightforward methodology we use for this gf bread locks in moisture with out making the dough troublesome to deal with or leading to a soggy bread.
Should you’ve by no means heard of a Japanese “water roux,” it is only a combination of gluten free flour and water that is briefly cooked on the stovetop till it thickens. It is also called tangzhong, which is designed to pre-gel the starches and assist the bread keep brisker, longer.
A gluten free water roux is straightforward to make with simply these 2 easy gluten free pantry elements, and you’ll even make it forward of time. After making the roux, you will let it cool after which add it to the remainder of the gf bread elements and make the softest gf bread of your life!
The best way to work with batter-style gluten free bread
I started making selfmade gluten free bread method again in 2005, solely my second 12 months of baking gluten free in any respect. These first breads had been all within the “batter-style,” which merely signifies that the bread dough seems extra like a cookie dough batter than what you’ll anticipate from yeast bread dough.
Since then, I’ve realized a lot about gf yeast bread baking, a lot of which yow will discover on this put up on methods to make gluten free bread. Regardless that I’ve moved on to develop different strategies, recipes like this gluten free Japanese milk bread and our old-style white gluten free bread nonetheless work superbly—and have a particular place in my kitchen (and my coronary heart ❤️).
The uncooked bread dough itself in batter-style bread baking is moist and stays that method all through shaping because it does not “stretch” when uncooked. Gluten free flours are sometimes water-loving, and the unique successes in gluten free yeast bread baking known as for including extra liquid to the bread to allow the yeast to thrive.
If any yeast bread dough is simply too dry or turns into that method throughout its rising time, the yeast is not going to thrive and the bread dough is not going to rise. My bread recipes made with gluten free bread flour have one thing totally different (whey protein isolate and Expandex modified tapioca starch) added to them.
With out that, all goal gluten free flours will take up tons of the water within the recipe and dry out the dough with out extra moisture. And that results in an underwhelming (or utterly absent) rise.
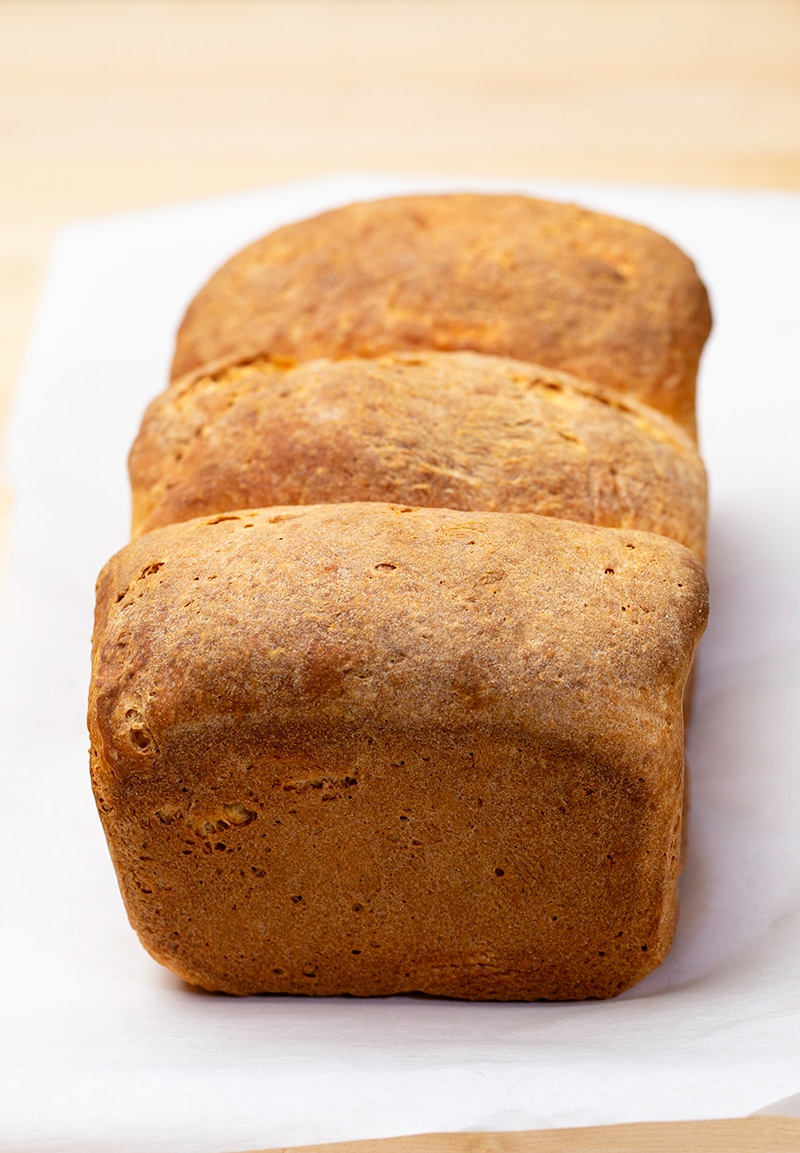
These batter-style bread recipes aren’t as simple to form as standard bread recipes, and the rise is not as easy. That is why you will see pockmarks within the bread each earlier than and after baking.
However they require fewer unfamiliar elements as my newer recipes, and they’re much simpler to adapt to accommodate further allergy symptoms (please scroll right down to the Elements and substitutions part for extra element on that).
Baking gluten free is not fairly so simple as switching standard flour for gluten free.
The best way to deal with this gluten free bread dough
Since this batter-style bread dough is sort of moist and should keep that method, remember that the dough shall be cheesy to the contact each earlier than, throughout and after shaping. It additionally is not going to rise as easily as we’d like, taking over one thing of a cratered look.
You may easy out the dough after its rise, in the event you like, with moist fingers however do not anticipate a good rise. Regardless that the dough is moist, although, the moisture remains to be in stability with the opposite elements within the recipe. Should you add an excessive amount of moisture, the bread will not ever bake all through to the middle and you may find yourself with gummy spots.
You may sprinkle this dough very evenly with extra flour as you are shaping it, however use as little as you probably can. Attempt flouring your fingers a bit, reasonably than the dough fairly often, and use a lightweight contact so the dough stays moist.
Keep in mind that you will not have the ability to get the dough to be utterly easy on the skin since you are not making standard bread, so let go of that objective!
You are utilizing gluten free flour, not wheat bread flour, and you make gluten free milk bread, not yeasted wheat bread. Let go of your preconceptions of methods to make yeast bread and revel in this recipe simply as it’s!
What’s a water roux and what does it do on this gluten free milk bread recipe
Our batter-style gluten free white sandwich bread develops a thick bakery-style crust on the skin. However this loaf of bread stays delicate all through the top of its baking.
The water roux that you simply make at the beginning of the recipe helps lock in moisture. It is only a easy cooked combination of gluten free flour and water.
The water roux will be made days forward of time (and even doubled, then divided for every loaf), and saved in a sealed container within the fridge. That method, you’ll be able to dump all of the elements into your mixer everytime you’re able to make some bread with out having to interact in that additional step of creating the roux.
Elements and substitutions for this gluten free Japanese milk bread recipe
The best way to make gluten free dairy free Japanese milk bread
This recipe comprises dairy within the type of butter and milk, each of that are typically not that troublesome to interchange. As an alternative of cow’s milk, you’ll be able to simply use unsweetened almond milk or coconut milk within the carton. Simply be certain to not use something nonfat (dairy or in any other case) because it has much less richness and extra components.
As an alternative of the butter, strive utilizing Earth Stability buttery sticks in each the bread dough and for brushing the highest of the bread. You would possibly truly even have the ability to use a mild-tasting additional virgin olive oil instead of butter as effectively, however I have not examined any fat on this recipe which might be liquid at room temperature.
Are you able to make this gluten free bread recipe with out eggs?
Since there is just one egg on this recipe, you’ll be able to strive utilizing a “chia egg” (1 tablespoon floor white chia seeds + 1 tablespoon lukewarm water, combined and allowed to gel) as a replacement. Since this can be a batter-style bread, you want a good quantity of assist getting it to rise. With out the egg, even with an egg replacer, the bread will doubtless be denser.
Are you able to make this gluten free bread recipe with out yeast?
No, you can not make this yeasted bread with out yeast as there isn’t any correct substitute for bread-making yeast. Attempt my yeast free gluten free sandwich bread as a substitute!
Changing prompt yeast with lively dry yeast
Should you solely have lively dry yeast, you should utilize that to interchange prompt yeast. Simply use 25% extra yeast (right here, that might be a complete of 10 grams for one loaf). You may additionally must hydrate the yeast in a couple of tablespoons of the recipe’s milk quantity earlier than including it to the dough similtaneously the remainder of the milk.

The best way to make tremendous delicate gluten free Japanese milk bread, step-by-step
Gluten Free Japanese Milk Bread
For the softest gluten free Japanese milk bread, start with a easy cooked water roux of water and gf flour. It is simpler than you suppose, and you will be amazed at how tender, chewy, and scrumptious this gf bread is!
Yield: 12 slices bread
Forestall your display screen from going darkish
Elements
For the gf bread dough
- 3 cups (420 g) all goal gluten free flour mix (I used Higher Batter), plus extra for sprinkling
- 1 ½ teaspoons xanthan gum omit in case your mix already comprises it
- ¼ teaspoon cream of tartar
- ¼ cup (50 g) granulated sugar
- 2 ½ teaspoons (8 g) prompt yeast (additionally known as rapid-rise or breadmaker yeast)
- ½ teaspoon kosher salt
- 1 teaspoon apple cider vinegar
- 1 (50 g (weighed out of shell)) egg at room temperature
- 1 ¼ cups (10 fluid ounces) heat milk (about 100°F)
- 4 tablespoons (56 g) unsalted butter melted and cooled
- Water roux at room temperature
- Melted butter for brushing (non-compulsory)
Directions
First, make the water roux.
-
In a small saucepan, place the roux elements and whisk to mix effectively. Cook dinner the roux over medium-high warmth, whisking continually, till thickened sufficient that the whisk leaves a visual path.
-
Take away it from the warmth instantly and permit to chill to at the very least heat room temperature. The roux will be made forward of time and saved in a sealed container within the fridge. Simply enable it to come back to room temperature earlier than baking with it.
Make the bread dough.
-
Grease and line a normal 9-inch x 5-inch loaf pan and set it apart.
-
Within the bowl of a stand mixer fitted with the paddle attachment, place 3 cups of the flour, xanthan gum, cream of tartar, sugar and yeast, and whisk with a separate handheld whisk to mix effectively. Add the kosher salt, and whisk as soon as once more to mix.
-
Add the vinegar, egg, milk, butter, and water roux, and blend effectively on low pace. As soon as the dry elements have been included into the moist elements, flip the mixer as much as excessive pace and permit to combine for about 3 minutes. The dough needs to be shaggy and cheesy to the contact.
-
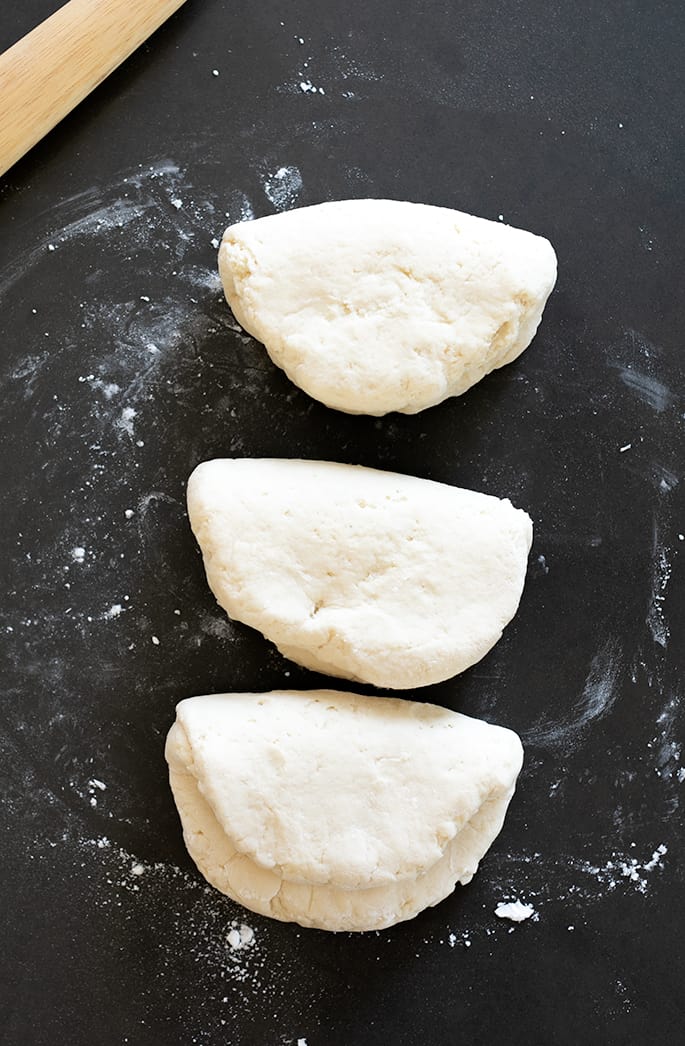
Flip the dough out onto a really evenly floured floor, and divide into 3 equal parts (every about 350 grams). Work with one piece of dough at a time.
-
Pat out the primary piece of dough right into a flat disk about 3/4-inch thick. Fold the disk loosely in half from one quick finish to the opposite. Repeat with the remaining items of dough.
-
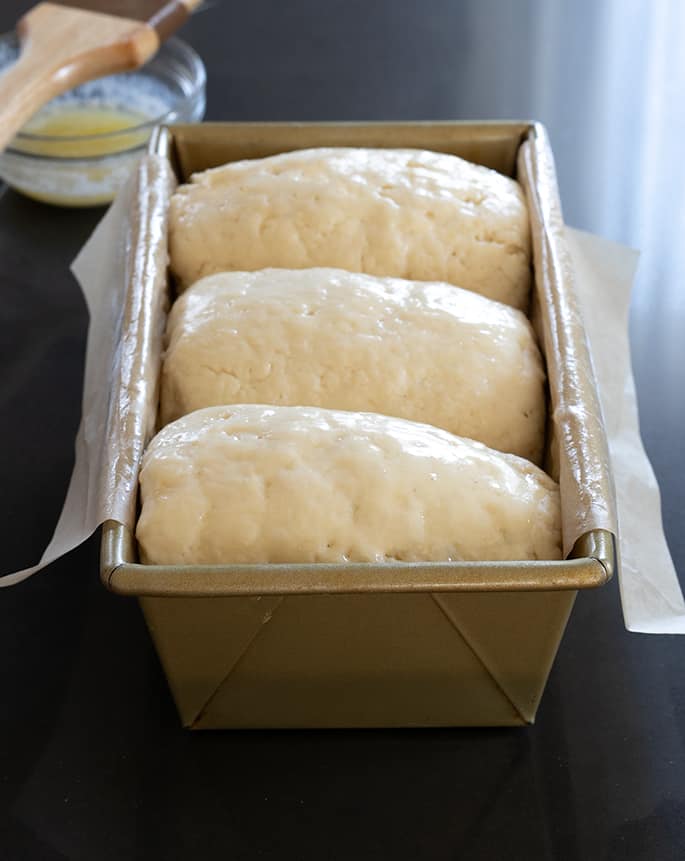
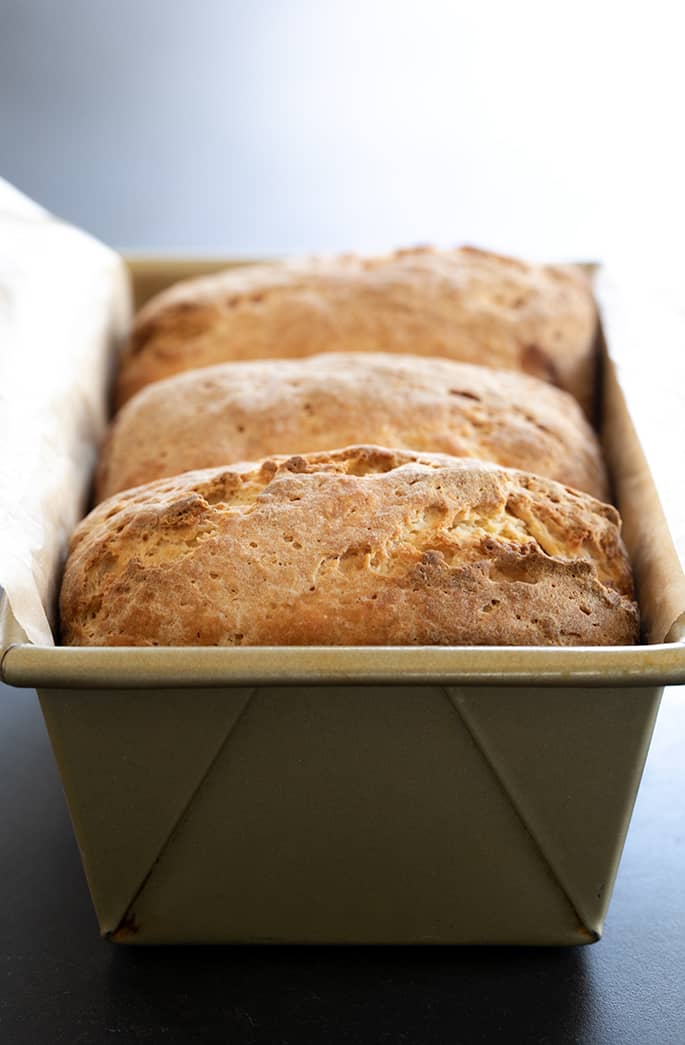
Stack the folded items of dough one behind the opposite, the rounded (folded) half dealing with up. The formed items of dough ought to match snugly within the pan from finish to finish, and can stand up, not out.
-
Spray the dough evenly with heat water, and canopy the pan loosely with plastic wrap. Place in a heat, draft-free location to rise till it has reached about 150% of its authentic quantity.
-
Whereas the dough is rising, preheat your oven to 350°F.
-
As soon as the dough has completed rising, take away the plastic wrap, brush evenly with the non-compulsory melted butter, and place within the heart of the preheated oven. Bake for 45 minutes.
-
Take away the bread from the loaf pan and switch to a rimmed baking sheet. Return the bread on the baking sheet to the oven.
-
Proceed to bake till the loaf sounds hole when thumped on the aspect and reads about 190°F when an instant-read thermometer is inserted within the heart of the loaf and is evenly golden brown throughout (about one other 10 minutes). Take away the loaf from the oven and switch it to a wire rack to chill utterly earlier than slicing and serving.

Gluten Free Japanese Milk Bread
For the softest gluten free Japanese milk bread, start with a easy cooked water roux of water and gf flour. It is simpler than you suppose, and you will be amazed at how tender, chewy, and scrumptious this gf bread is!
Yield: 12 slices bread
Forestall your display screen from going darkish
Elements
For the gf bread dough
- 3 cups (420 g) all goal gluten free flour mix (I used Higher Batter), plus extra for sprinkling
- 1 ½ teaspoons xanthan gum omit in case your mix already comprises it
- ¼ teaspoon cream of tartar
- ¼ cup (50 g) granulated sugar
- 2 ½ teaspoons (8 g) prompt yeast (additionally known as rapid-rise or breadmaker yeast)
- ½ teaspoon kosher salt
- 1 teaspoon apple cider vinegar
- 1 (50 g (weighed out of shell)) egg at room temperature
- 1 ¼ cups (10 fluid ounces) heat milk (about 100°F)
- 4 tablespoons (56 g) unsalted butter melted and cooled
- Water roux at room temperature
- Melted butter for brushing (non-compulsory)
Directions
First, make the water roux.
-
In a small saucepan, place the roux elements and whisk to mix effectively. Cook dinner the roux over medium-high warmth, whisking continually, till thickened sufficient that the whisk leaves a visual path.
-
Take away it from the warmth instantly and permit to chill to at the very least heat room temperature. The roux will be made forward of time and saved in a sealed container within the fridge. Simply enable it to come back to room temperature earlier than baking with it.
Make the bread dough.
-
Grease and line a normal 9-inch x 5-inch loaf pan and set it apart.
-
Within the bowl of a stand mixer fitted with the paddle attachment, place 3 cups of the flour, xanthan gum, cream of tartar, sugar and yeast, and whisk with a separate handheld whisk to mix effectively. Add the kosher salt, and whisk as soon as once more to mix.
-
Add the vinegar, egg, milk, butter, and water roux, and blend effectively on low pace. As soon as the dry elements have been included into the moist elements, flip the mixer as much as excessive pace and permit to combine for about 3 minutes. The dough needs to be shaggy and cheesy to the contact.
-
Flip the dough out onto a really evenly floured floor, and divide into 3 equal parts (every about 350 grams). Work with one piece of dough at a time.
-
Pat out the primary piece of dough right into a flat disk about 3/4-inch thick. Fold the disk loosely in half from one quick finish to the opposite. Repeat with the remaining items of dough.
-
Stack the folded items of dough one behind the opposite, the rounded (folded) half dealing with up. The formed items of dough ought to match snugly within the pan from finish to finish, and can stand up, not out.
-
Spray the dough evenly with heat water, and canopy the pan loosely with plastic wrap. Place in a heat, draft-free location to rise till it has reached about 150% of its authentic quantity.
-
Whereas the dough is rising, preheat your oven to 350°F.
-
As soon as the dough has completed rising, take away the plastic wrap, brush evenly with the non-compulsory melted butter, and place within the heart of the preheated oven. Bake for 45 minutes.
-
Take away the bread from the loaf pan and switch to a rimmed baking sheet. Return the bread on the baking sheet to the oven.
-
Proceed to bake till the loaf sounds hole when thumped on the aspect and reads about 190°F when an instant-read thermometer is inserted within the heart of the loaf and is evenly golden brown throughout (about one other 10 minutes). Take away the loaf from the oven and switch it to a wire rack to chill utterly earlier than slicing and serving.