


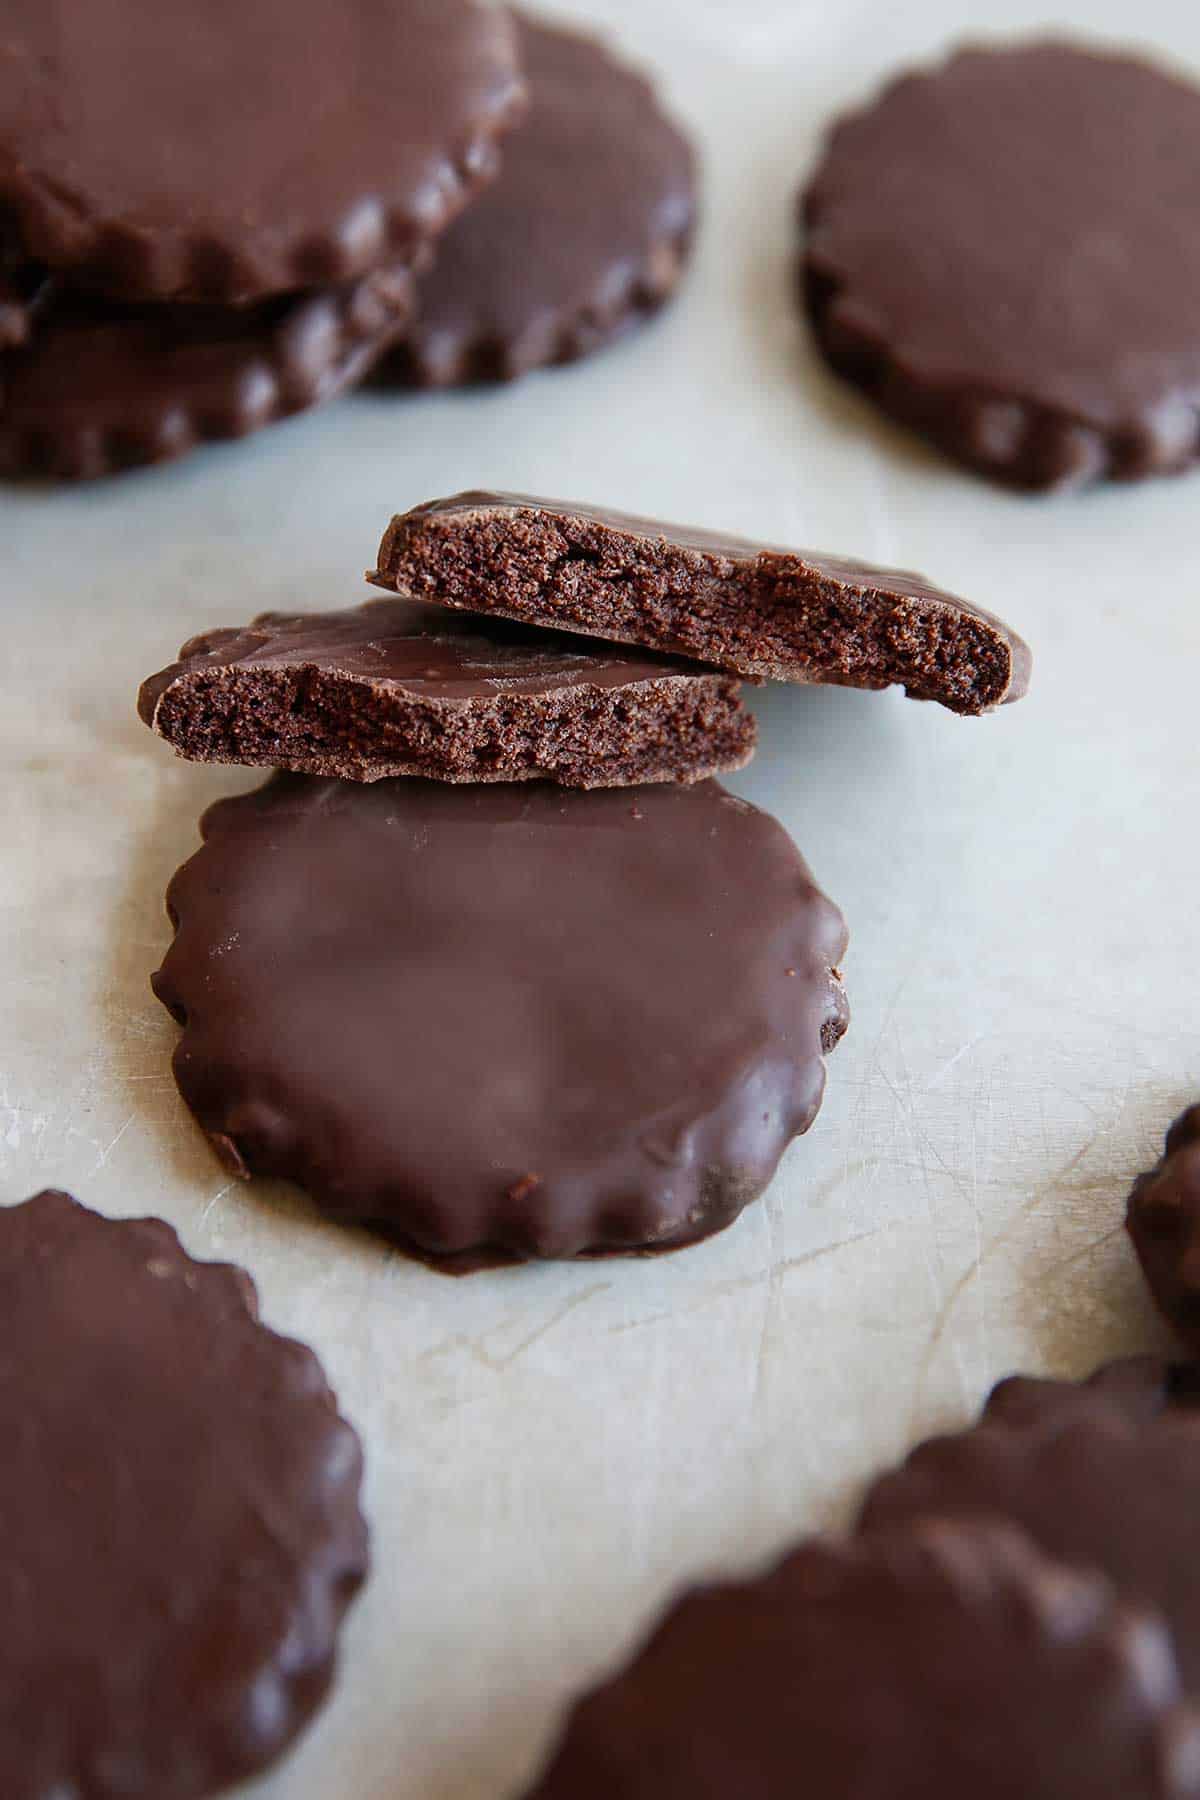
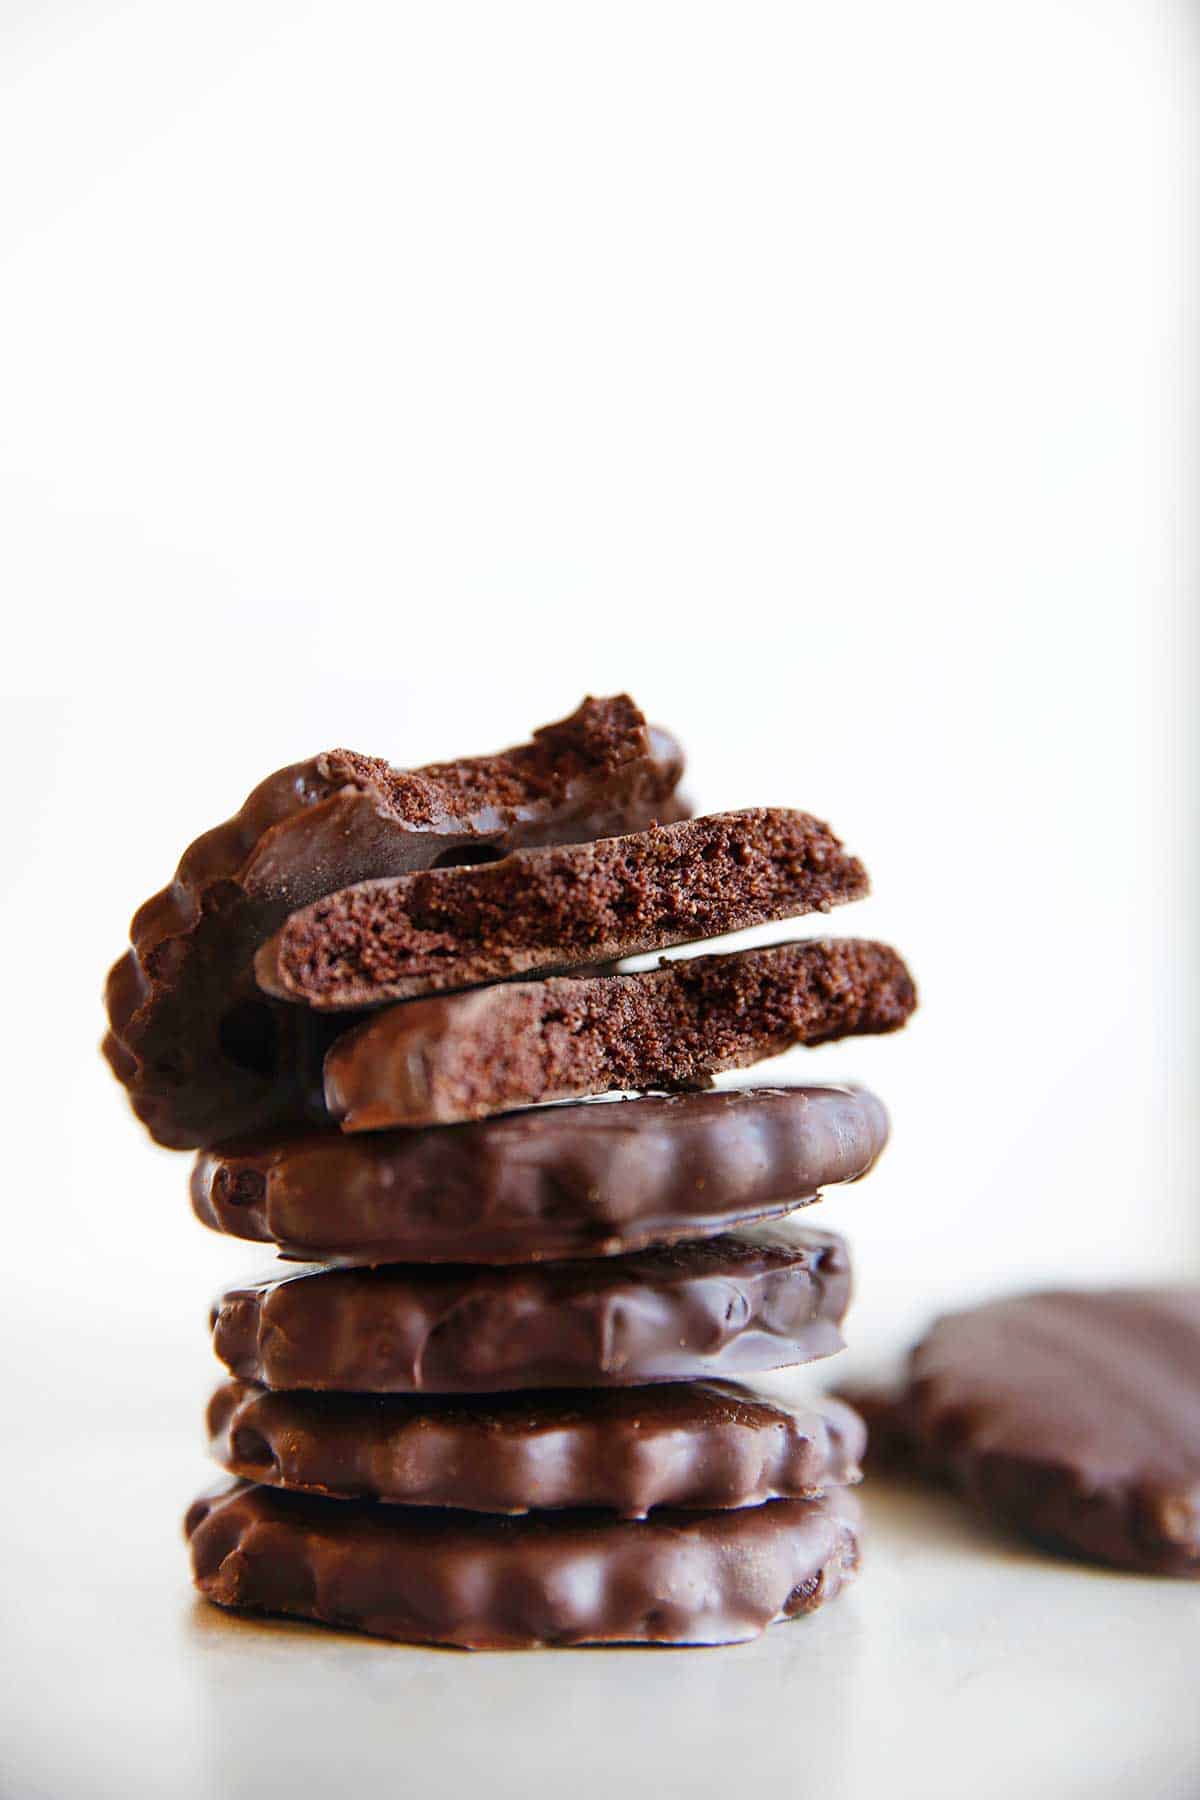
On the lookout for a more healthy model of your favourite Lady Scout cookie? These Gluten-Free Skinny Mints are simply that! Crunchy, minty, chocolate-y, and simply the correct amount of sweetness!
They’re the true deal, whereas additionally being gluten-free, grain-free and refined sugar free!
Home made Wholesome Skinny Mint Cookies
Rising up I used to be undoubtedly extra of a Samoa or Tagalong type of lady. However in maturity, my palette switched to the Skinny Mints. So naturally, I needed to recreate them. I really like having the ability to make my favourite childhood favorites at house, however with actual, whole-food elements! That is no knock on the Lady Scouts and I’m all for supporting these candy kiddos, however generally you simply wish to bask in a long-time favourite deal with however lighten it up a bit! And this recipe undoubtedly is that.
These cookies are fairly easy to arrange, however if you’re new to working with gluten-free cookie recipes we share all the information beneath for the way to achieve success right here!
These crunchy chocolate cookies are so scrumptious and the proper deal with to retailer away within the freezer for every time your candy tooth strikes.
Substances Wanted
Scroll down for the total recipe!
- Almond Flour
- Tapioca Flour
- Cocoa Powder
- Salt
- Butter
- Vanilla Extract
- Peppermint Extract
- Honey
- Coconut Sugar
- Darkish Chocolate
- Coconut Oil
Seeking to substitute the almond flour?
This can be a widespread query we get. Sadly, we will’t supply an alternative to this as it’s the principal ingredient on this cookie.
If you happen to do attempt to substitute it with one other flour, please come again and remark/share the way it went for you!
Instruments Wanted
Ideas for Making Gluten-Free Skinny Mints
It’s fairly easy to place this dough collectively, however you have to have the proper temperature butter! This recipe requires softened butter. Others have had a problem with the dough after they attempt to make this with melted butter.
Butter FYI
Utilizing melted butter will make this dough method too gentle. So please, take your butter out of the fridge at the very least two hours earlier than you propose to make the dough.
Upon getting the proper butter temperature, all you must do is add the elements to a bowl and blend it collectively–it’s that straightforward! The dough needs to be thick, however nonetheless fairly sticky.
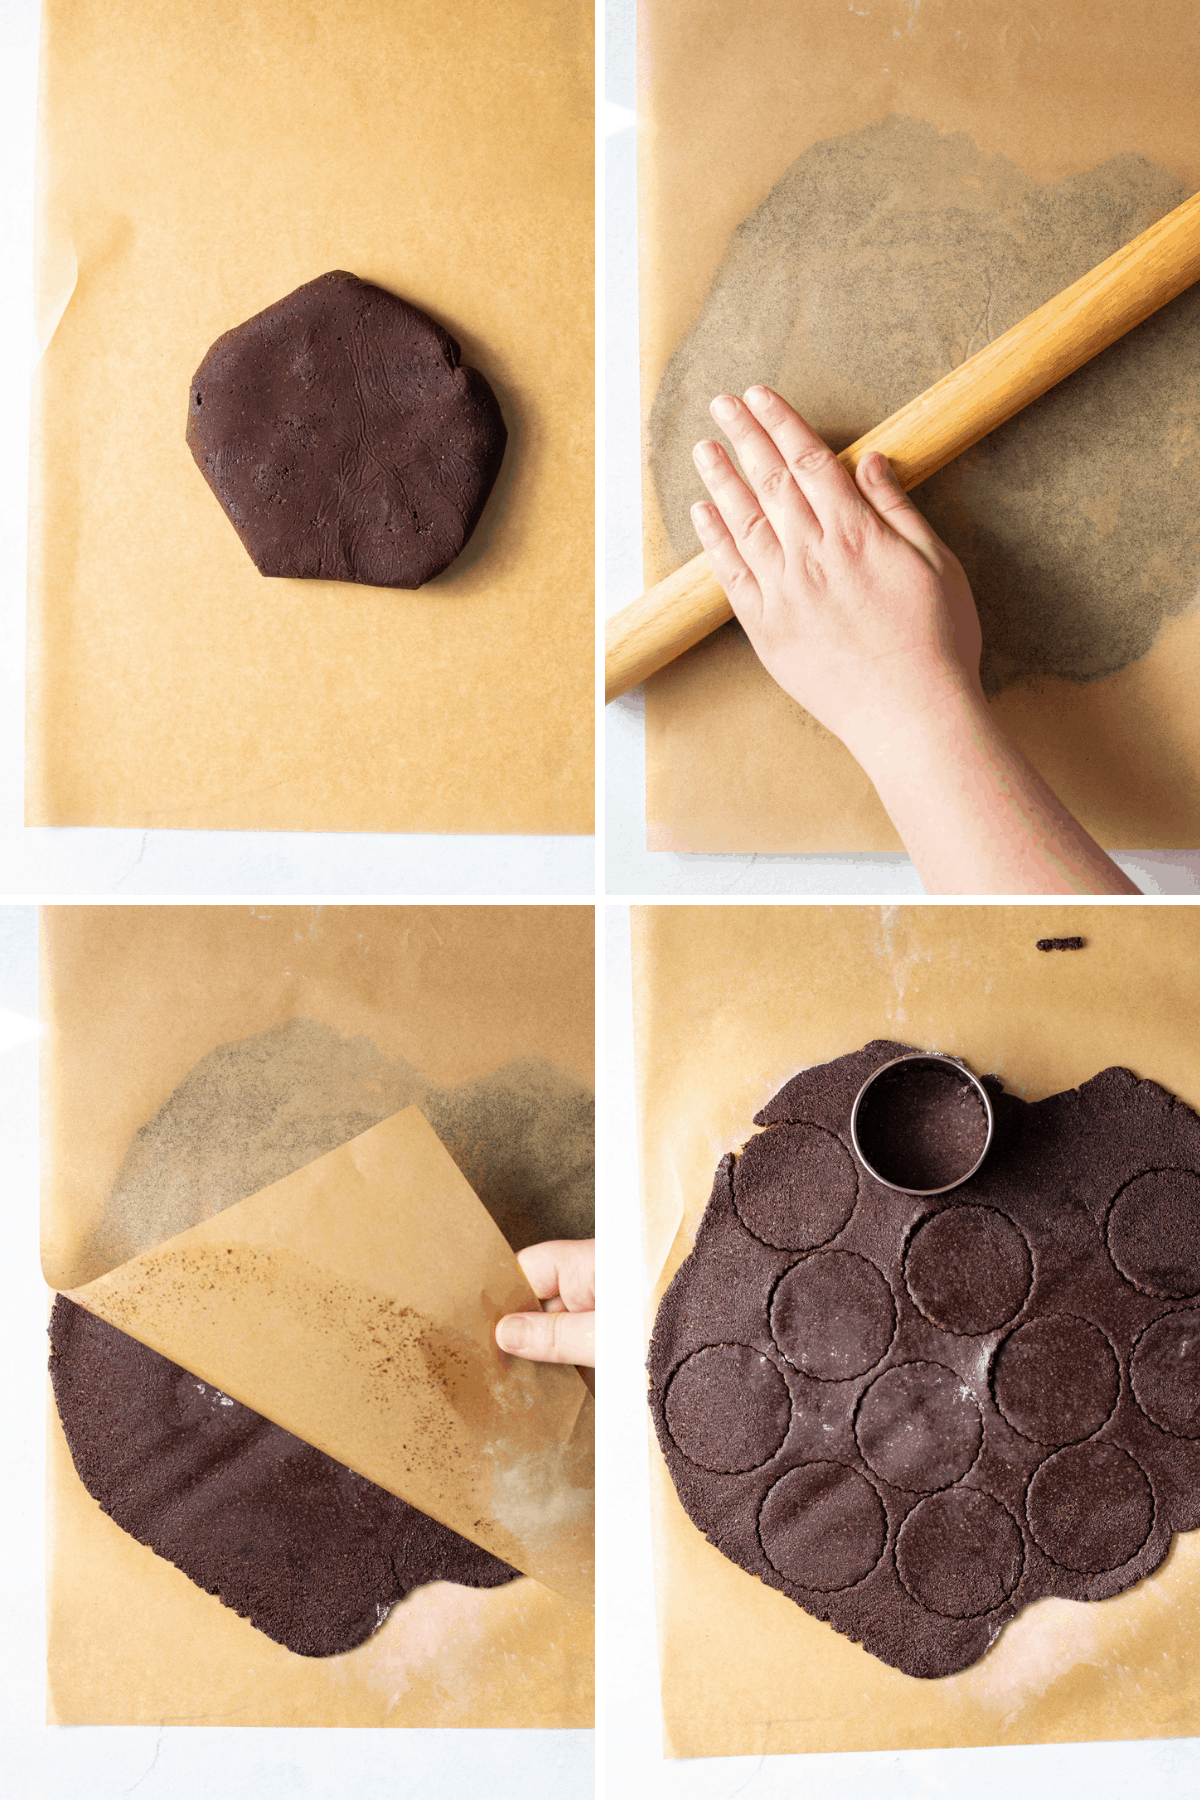
As soon as the dough is totally blended, wrap it in a bit of parchment and stick it within the fridge for at the very least an hour. If doable, let it sit to sit back for two hours. As soon as it’s completely agency, it’s able to roll!
Roll Out the Dough
That is the one difficult half about this recipe: rolling and transferring the dough to the baking sheet. However don’t fear, I’m sharing my greatest ideas for working with this gluten-free dough.
- First, make sure that your dough is chilled.
- Place the dough on a bit of parchment paper, after which sprinkle it with tapioca starch. Flip the dough over and sprinkle the opposite aspect with tapioca starch. Then place one other piece of parchment on prime of the dough. Now you might be able to roll it out! The parchment is used as a result of it’s a straightforward floor to take away from the cookies, and so you’ll be able to switch the dough on it in case your dough will get too heat.
- The dough needs to be rolled out to a thickness of 1/4″.
- Then, use your cookie cutter to stamp out as many cookies as doable.
- When you’ve stamped your cookies, it’s time to switch them to a (new) parchment-lined baking sheet. In case your dough is sort of heat, I like to recommend sticking it again within the fridge for quarter-hour earlier than transferring the cookies. To do that, simply slide the dough instantly on the parchment onto a sheet pan and into the fridge. As soon as the dough is chilled, it’s a lot simpler to efficiently transfer the cookie cutouts.
- To elevate the cookies, mud a mini offset spatula blade with tapioca starch and slide it beneath the cookie to loosen the cookie from the parchment. Use the spatula to switch the cookie onto the baking sheet.
There’s some finesse to this, however it shouldn’t be very achievable in case your cookie dough is the suitable consistency.
To Freeze or To not Freeze
Many individuals, together with myself, like to freeze skinny mints and eat them straight from the freezer. And that’s an effective way to take pleasure in this gluten-free model.
Freezing: These cookies will hold properly within the freezer for as much as 3 months. Retailer them in an air-tight container.
Don’t wish to freeze them? That’s positive, however they may have to be saved within the fridge since they’re coated in chocolate. The cookies will hold for at the very least 5 days.
Watch The Video:
Extra Cookie Recipes:

- 1-1/4 cups almond flour
- 1/3 cup unsweetened cocoa powder
- 1 tablespoon tapioca flour plus extra for rolling
- 2 teaspoons coconut sugar
- Pine positive sea salt
- 5 tablespoons butter softened
- 3 tablespoon honey or maple syrup
- 1 teaspoon vanilla extract
- 1/2 teaspoon peppermint extract
Chocolate Coating:
- 1 cup darkish chocolate chips
- 1/4 teaspoon peppermint extract
- 2 teaspoons coconut oil or extra as wanted
-
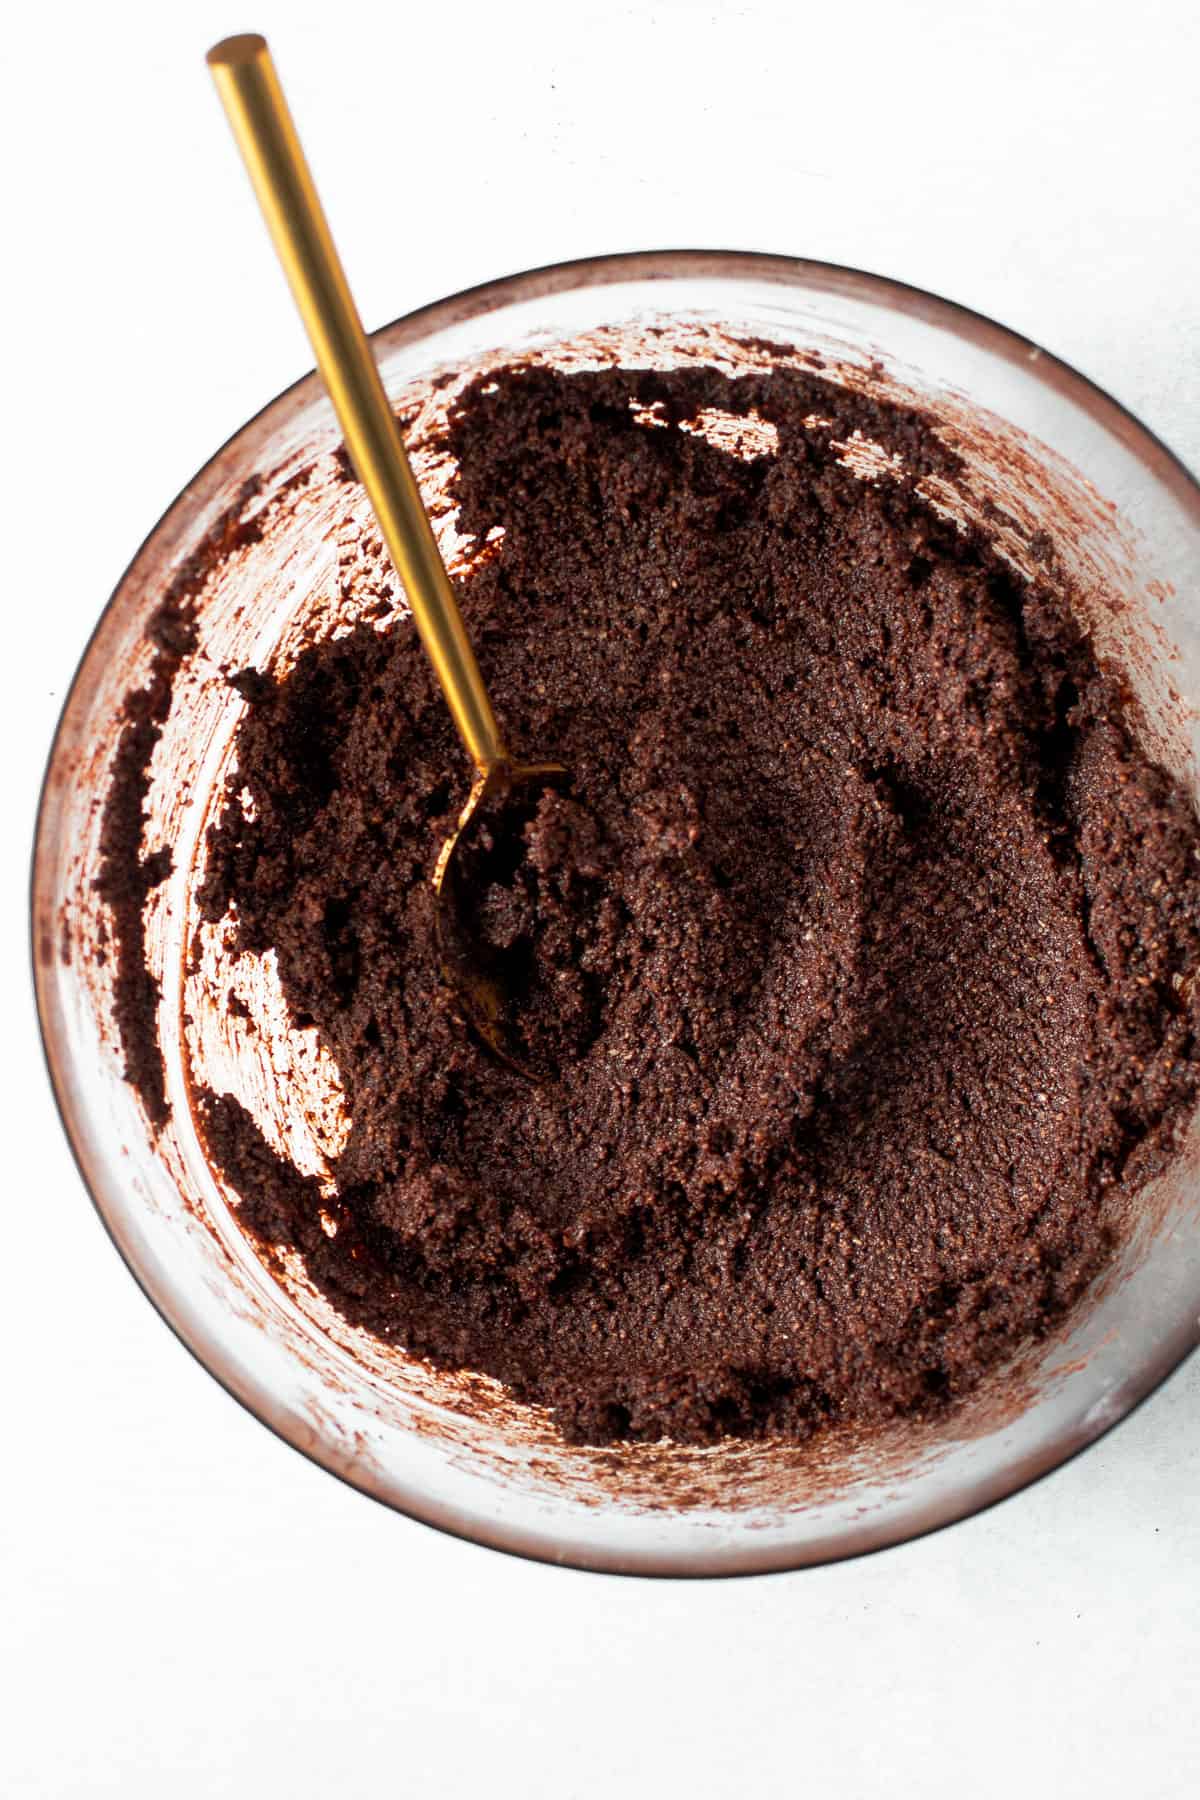
Add almond flour, cocoa powder, tapioca flour, coconut sugar, and salt to a bowl. Whisk collectively till mixed.
-
Add within the softened butter, honey, vanilla, and peppermint extract. Utilizing a heavy spoon, combine the dough all collectively till absolutely mixed with no seen butter streaks remaining.
-
Switch the dough to a bit of parchment or plastic wrap, and wrap it up. Chill the dough within the fridge for at the very least one hour or as much as 1 day.
-
As soon as the dough is chilled, preheat the oven and line a baking sheet with parchment paper.
-
Place the dough on one other piece of parchment paper on a piece floor, after which sprinkle it with tapioca starch. Flip the dough over and sprinkle the opposite aspect with tapioca starch. Then place one other piece of parchment on prime of the dough. Roll the dough to a thickness of 1/4″. Then, use your cookie cutter to stamp out as many cookies as doable. You may reroll the scraps to get extra cookies.
-
Mud a mini off-set spatula with tapioca starch, and slide it beneath the cookie to elevate it off the parchment and switch to the baking sheet. If at any level the dough is just too gentle to deal with, switch it to the fridge to agency up for 10 minutes.
-
Bake the cookies for quarter-hour. As soon as executed, switch the cookies to a cooling rack.
-
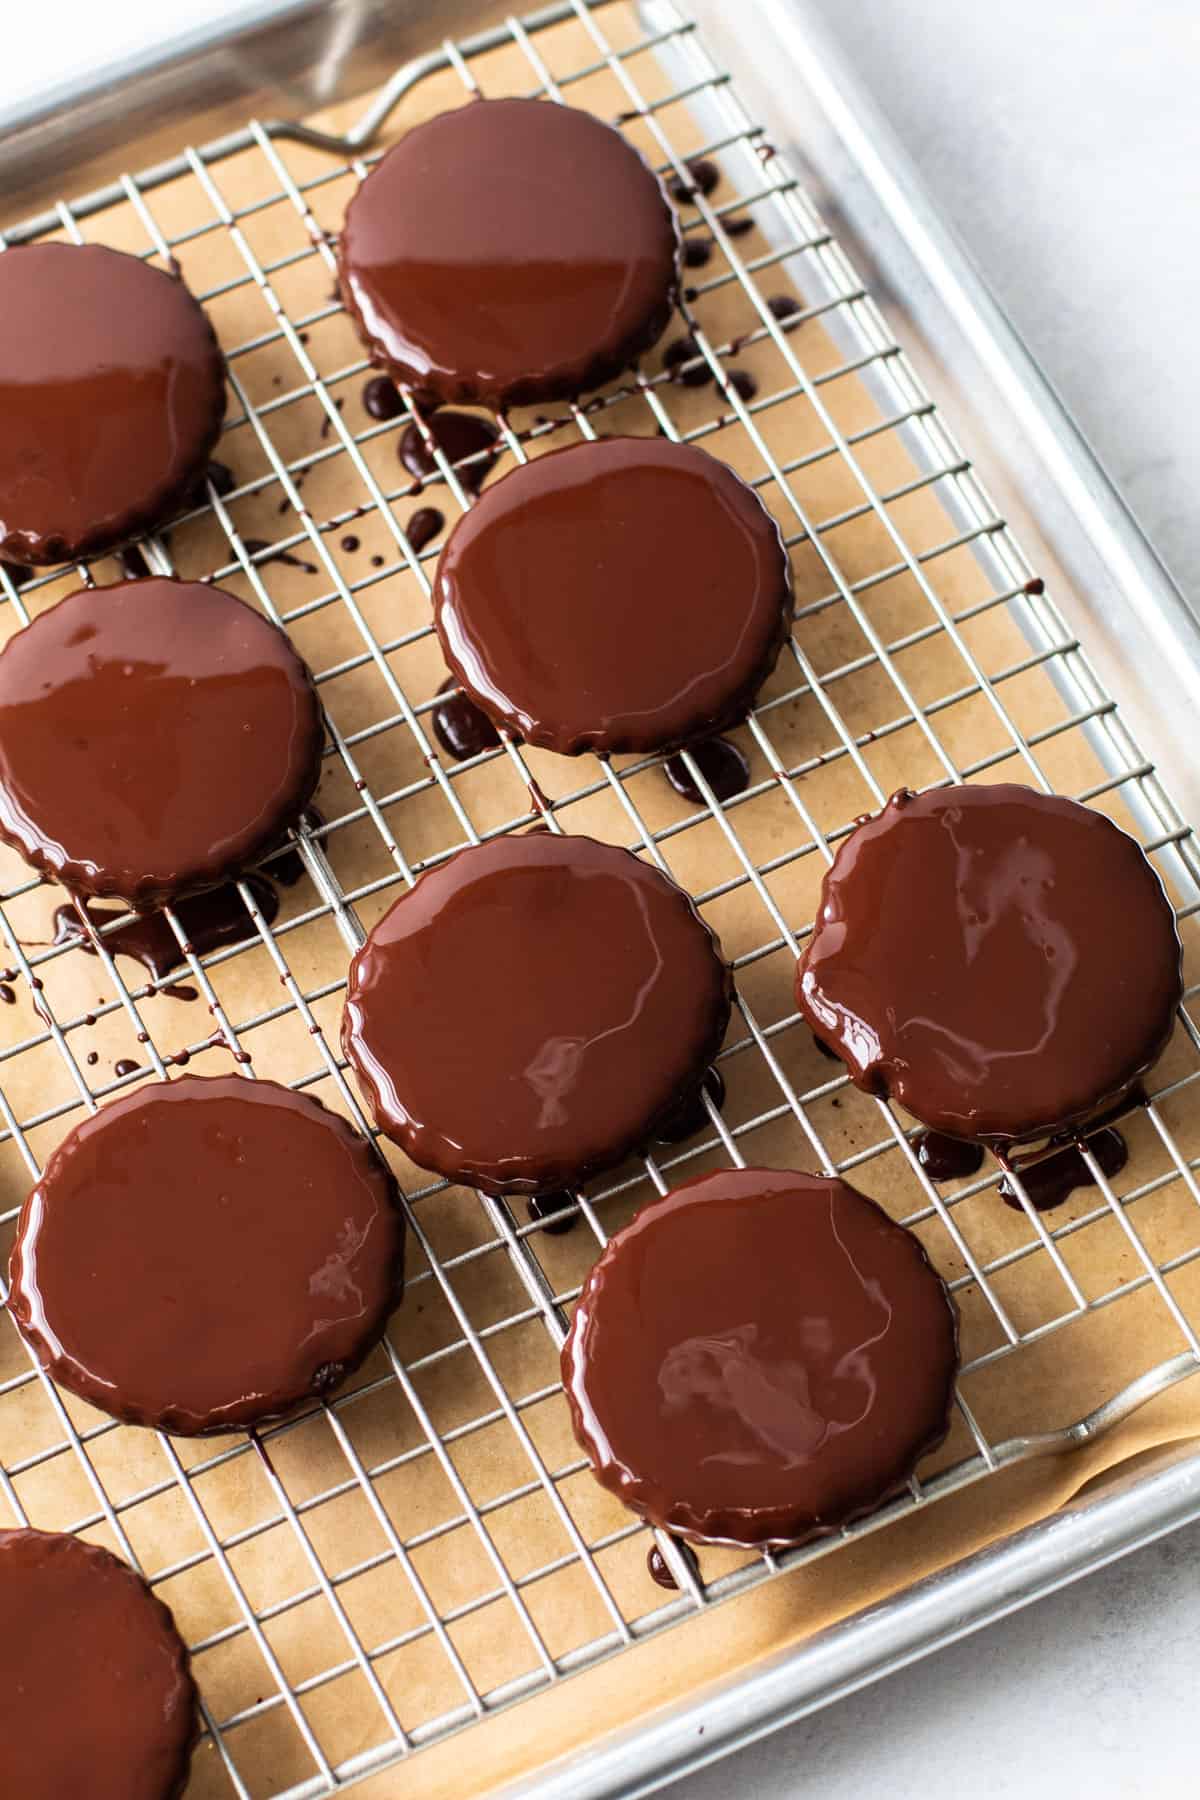
In the meantime, over a double boiler, soften the chocolate, coconut oil, and extract collectively. Drop the cookie into the melted chocolate till absolutely coated. Use a fork to elevate the cookie out of the chocolate, letting the surplus drop off. Switch cookies to a bit of parchment paper. Repeat with the remaining cookies.
-
Let chill in the fridge (or freezer) for at the very least 10 minutes, or till the chocolate has hardened. Retailer within the fridge for as much as 5 days, or the freezer for as much as 3 months.
This recipe was up to date in March 2017 with a barely altered recipe and new step-by-step pictures had been added in March 2021.
Serving: 1cookieEnergy: 195kcalCarbohydrates: 17.4gProtein: 3.6gFats: 14.1gSaturated Fats: 6.4gLdl cholesterol: 11mgSodium: 46mgFiber: 1.7gSugar: 11.8g